Week 6 | Long Time Gone Sew-along | Plus a Star Block
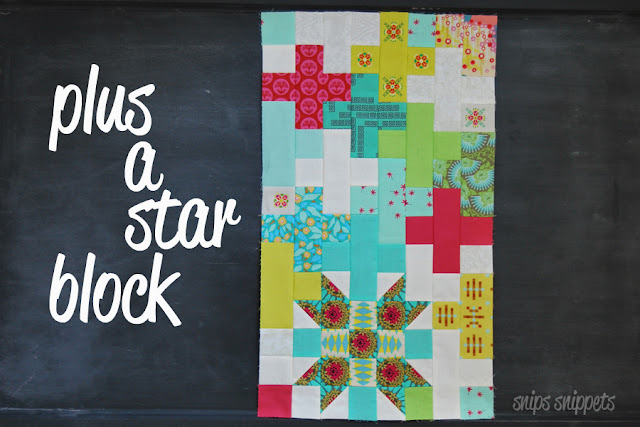
Hello, hello! We are back this week with a block that I definitely struggled with. My OCD was all over the place with this one but in the end I'm so happy with it. We're working this week on the Plus a Star block!
This is an easy one to put together but requires a bit of planning in advance. If you have a design wall it will definitely come in handy, if not make use of your bed, couch, floor, bust out the refrigerator magnets... you get the idea! Are we ready to get this one done? Let's go!
General Information
Measurements for the pieces needed to construct this block will not be
provided in this tutorial. It is a pre-requiste of making this block
that you have a copy of the pattern, Long Time Gone by Jen
Kingwell. Measurements, where applicable, can be found in this book and
it’s associated media.
If you’re using the Marti Michell Perfect Patchwork Templates you can find the conversion chart by clicking here.
I
have no hard and fast rule for pressing. I generally press my seams in
the direction they want to go. When pressing blocks like HST's I press my seams open,
but for simple patchwork I like to press to the darkside. I then
press my seams open when attaching rows together to avoid bulk. But
find a way that
works for you and be consistent with it. I've include a photo of the back of part of my block so you can see how I've pressed my seams.
First
up, gathering and cutting your fabrics, cutting instructions for this
block can be found on page 11 of your instruction book. I've gone with a large variety of prints and solids for this block but kept within a specific colour scheme. I almost want to remake all my blocks in this exact colour palette now. Almost.
We're going to start by making our HST's, I found it easier to pick fabrics for the pluses after I had made the star block.


You need eight half square triangle units total.
Now using your design wall, arrange the HST's with the squares for the nine patch unit to form your star block. You may want to think about which fabrics you use for the background of the HTS's as they become part of the plus blocks. I wanted to stick with my cream solid for my background so I just made sure to make two of the pluses cream.
Now the instructions would have us sew the nine patch pieces into a nine patch block. Don't.
Leave them unsewn as we will be sewing the pieces together into columns once we get the pluses sorted.
With your star block up on your design wall, start filling in the plus blocks. I cut mine as I went, I just found it easier that way. But if you want to cut all your pieces out first that works too, just note that the instructions call for 16 of the larger rectangles for the plus blocks and you actually only need 15.

Keep arranging and rearranging until you find that happy place where everything is just where you want it.
In my case, that involved a lot of pluses cut out and not used, as well as a couple of HST's that I thought would work but in the end I just wasn't feeling it.

Lately I've been embracing my new found ability to cut into fabrics without fully knowing if I'm going to actually use them in the project. I'd much rather cut up a bunch of fabrics to find that perfect fit than settle for something that I'm just ho hum with. And besides, I can always use the cut up bits in another project right?!
So once you have your pieces arranged in just the right way it's time to sew them up!
I found it easiest to transfer the pieces in rows of two to a scrap piece of batting then carrying that to my machine. Keep your pieces in the proper order and you won't have to worry about things getting mixed around.


And before you know it, BLAM!

One positively perfect block!
Hope you all enjoy the ease of this one because next week we tackle the little churn dashes, and there's a lot of them!!
Don't forget to pop over to Angie's by clicking here, to see her block, it has some serious POP to it!! And to also find out what handy tips and tricks she has!
Marti Michell is also offering a conversion chart and tutorial on how to make this block using her templates. See Marti’s tutorial and get the conversion chart by clicking here.
We've made it as simple as possible for you to win. To be eligible for all prizes on offer all you have to do is:
For more information you can find commonly asked questions and their answers by clicking here.
FYI,
When this post goes live I will be on a plane to Walt Disney World (wahoo!!) to celebrate my birthday with my two little guys and my mom and little sis. I will do my best to answer any questions asked but please be patient. I don't know how great the internet will be at our resort. That and I'll be having too much fun! Haha! Also, there have been a lot of no reply bloggers leaving comments. If you want a reply please leave your email address in the comments. Or google "no reply blogger" to find out how you can become a "reply" blogger. Thanks!!
So that's it for this week, have fun and don't forget to use a design wall, it will help immensely!
All the high fives go to my little sister this week for taking us to Disney!
xo nicole

We're going to start by making our HST's, I found it easier to pick fabrics for the pluses after I had made the star block.


You need eight half square triangle units total.
Now using your design wall, arrange the HST's with the squares for the nine patch unit to form your star block. You may want to think about which fabrics you use for the background of the HTS's as they become part of the plus blocks. I wanted to stick with my cream solid for my background so I just made sure to make two of the pluses cream.
Now the instructions would have us sew the nine patch pieces into a nine patch block. Don't.
Leave them unsewn as we will be sewing the pieces together into columns once we get the pluses sorted.
With your star block up on your design wall, start filling in the plus blocks. I cut mine as I went, I just found it easier that way. But if you want to cut all your pieces out first that works too, just note that the instructions call for 16 of the larger rectangles for the plus blocks and you actually only need 15.

Keep arranging and rearranging until you find that happy place where everything is just where you want it.
In my case, that involved a lot of pluses cut out and not used, as well as a couple of HST's that I thought would work but in the end I just wasn't feeling it.

Lately I've been embracing my new found ability to cut into fabrics without fully knowing if I'm going to actually use them in the project. I'd much rather cut up a bunch of fabrics to find that perfect fit than settle for something that I'm just ho hum with. And besides, I can always use the cut up bits in another project right?!
So once you have your pieces arranged in just the right way it's time to sew them up!
I found it easiest to transfer the pieces in rows of two to a scrap piece of batting then carrying that to my machine. Keep your pieces in the proper order and you won't have to worry about things getting mixed around.


I worked in columns of two, sewing them together, then pressing the seams open as I went.

And before you know it, BLAM!

One positively perfect block!
Hope you all enjoy the ease of this one because next week we tackle the little churn dashes, and there's a lot of them!!
Don't forget to pop over to Angie's by clicking here, to see her block, it has some serious POP to it!! And to also find out what handy tips and tricks she has!
Marti Michell is also offering a conversion chart and tutorial on how to make this block using her templates. See Marti’s tutorial and get the conversion chart by clicking here.
Prize Winning Details
Of course the ultimate prize is making this amazing quilt, but if you'd like to also throw your hat in the ring to win some amazing prizes from our amazing sponsors then here's the information you need to know. You can find out more about our sponsors and the prizes on offer by clicking here.We've made it as simple as possible for you to win. To be eligible for all prizes on offer all you have to do is:
- Post a photo of this weeks block to your Instagram account between 12:01am April 19th and 11:59pm April 25th 2017 in your timezone.
- Tag your photo with the hashtags #LongTimeGoneSAL #AlisonGlass #AndoverFabrics #SewWithTheBest #AnnaMariaHorner #FreeSpiritFabrics #JenKingwell #LongTimeGoneQuilt #AmitieTexiles #MartiMichell #LovePatchworkQuilting
- Be Following these accounts on Instagram:
- @GnomeAngel
- @SnipsSnippets
- @AlisonGlass
- @AnnaMariaHorner
- @JenKingwell
- @AndoverFabrics
- @FreeSpiritFabrics
- @MartiMichell
- @LoveQuiltingMag
You will also need to do the following:
- Post a photo of each of the blocks in their relevant weeks in your timezone. You can find the block timetable by clicking here.
- Complete the quilt top and post it to Instagram within 12 July and Midnight 21 July in your timezone.
- All photos will need to have the relevant hashtags on them.
- You will need to be following all the relevant Instagram accounts at the time of the drawing.
Need help keeping all of that clear in your head, Angie has made up a fabulous Long Time Gone SAL Tracker, you can grab it by clicking here to download.
FYI,
When this post goes live I will be on a plane to Walt Disney World (wahoo!!) to celebrate my birthday with my two little guys and my mom and little sis. I will do my best to answer any questions asked but please be patient. I don't know how great the internet will be at our resort. That and I'll be having too much fun! Haha! Also, there have been a lot of no reply bloggers leaving comments. If you want a reply please leave your email address in the comments. Or google "no reply blogger" to find out how you can become a "reply" blogger. Thanks!!
So that's it for this week, have fun and don't forget to use a design wall, it will help immensely!
All the high fives go to my little sister this week for taking us to Disney!
xo nicole


Ooh I loved the grey with turquoise flecks on your half squares that you opted not to use. Definitely use them in something else or incorporate them into the backside of this quilt! And thanks again for all the outstanding tips. I'm learning a lot on this adventure!
ReplyDeleteLove your block so hard. Funny how we both sewed it in columns - great minds! ;)
ReplyDeleteI love your blog, thank you for sharing the tips. The tecture looks awesome to me. I look forward to your next article Keep up the good job.
ReplyDeleteYou made some decent points there. I looked on the internet for the issue and found most individuals will go along with with your website. download instagram videos
ReplyDeleteI admire people who keep sharing valuable stories through great writing. I'm glad to have read this blog. Thanks and hope to read more soon. Check out Lawrence Todd Maxwell's to learn more about real estate.
ReplyDelete